컴퓨터프로그래밍및실습 (2022년)/1124
Jump to navigation
Jump to search
JavaFX 개요
- AWT
- Native UI 컴포넌트 사용
- 운영체제 마다 UI 모양이 다름
- Swing
- 운영체제가 제공하는 native UI 사용 안 함
- 운영체제가 새롭게 제공하는 UI 지원의 어려움
- JavaFX
- Abode의 flash, Microsoft의 silverlight의 대항마
- JDK 7부터 지원. JDK 8 권장.
- JDK 11부터는 별도로 설치해야 함.
- 화면 레이아웃과 스타일, 애플리케이션 로직 분리
- Java 코드와 분리해서 스타일 시트(CSS)로 외관 작성 → 개발자와 디자이너의 동시 개발 가능
- Java 코드에서도 레이아웃과 애플리케이션 로직을 분리하고 싶다면 레이아웃은 FXML로 작성, 로직은 Java로 작성
- JavaFX 애플리케이션 구성 요소
| [레이아웃] 자바 코드 파일 또는 FXML 파일 |
[외관 및 스타일] CSS 파일 |
[리소스] 그림 파일 동영상 파일 ... |
| [비즈니스 로직] 자바 코드 파일 |
JavaFX 애플리케이션 개발 시작
메인 클래스
import javafx.application.Application;
import javafx.stage.Stage;

public class AppMain extends Application {

    @Override
    public void start(Stage primaryStage) throws Exception {
        primaryStage.show();
    }

    public static void main(String[] args) {
        launch(args);
    }
}
JavaFX 라이프사이클(life cycle)
- 예제 코드
import javafx.application.Application;
import javafx.stage.Stage;

public class AppMain extends Application {
    public AppMain() {
        System.out.println(Thread.currentThread().getName() + ": AppMain() 호출");
    }

    @Override
    public void init() throws Exception {
        System.out.println(Thread.currentThread().getName() + ": init() 호출");
    }

    @Override
    public void start(Stage primaryStage) throws Exception {
        System.out.println(Thread.currentThread().getName() + ": start() 호출");
        primaryStage.show();
    }
    @Override
    public void stop() throws Exception {
        System.out.println(Thread.currentThread().getName() + ": stop() 호출");
    }

    public static void main(String[] args) throws Exception {
        System.out.println(Thread.currentThread().getName() + ": main() 호출");
        launch(args);
    }
}
- 실행 결과
main: main() 호출
JavaFX Application Thread: AppMain() 호출
JavaFX-Launcher: init() 호출
JavaFX Application Thread: start() 호출
JavaFX Application Thread: stop() 호출 ← 프로그램을 끝내야 실행된다.
메일 클래스 실행 매개값 얻기
C:> java AppMain --ip=192.168.0.5 --port=50001
- main()에서 launch(args)를 넘겨 받음
- init() 메소드에서 아래와 같이 실행할 수 있음
Parameters params = getParameters();
List<String> list = params.getRaw();
Map<String, String> map = params.getNamed();
무대(Stage)와 장면(Scene)
- 윈도우 : Stage
- Stage에는 하나의 Scene을 가질 수 있음
- Scene은 직접 생성해야 함
import javafx.application.Application;
import javafx.application.Platform;
import javafx.geometry.Pos;
import javafx.scene.Scene;
import javafx.scene.control.Button;
import javafx.scene.control.Label;
import javafx.scene.layout.VBox;
import javafx.scene.text.Font;
import javafx.stage.Stage;

public class AppMain extends Application {

    @Override
    public void start(Stage primaryStage) throws Exception {
        VBox root = new VBox();
        root.setPrefWidth(350);
        root.setPrefHeight(150);
        root.setAlignment(Pos.CENTER);
        root.setSpacing(20);

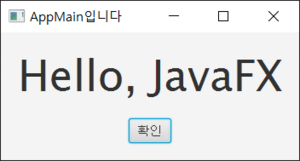
        Label label = new Label();
        label.setText("Hello, JavaFX");
        label.setFont(new Font(50));

        Button button = new Button();
        button.setText("확인");
        button.setOnAction(event->Platform.exit());

        root.getChildren().add(label);
        root.getChildren().add(button);

        Scene scene = new Scene(root); // VBox를 루트 컨테이너(root container)로 해서 Scene 생성

        primaryStage.setTitle("AppMain입니다");
        primaryStage.setScene(scene); // 윈도우에 장면 설정
        primaryStage.show();
    }

    public static void main(String[] args) {
        launch(args);
    }
}
JavaFX 레이아웃
프로그램적 레이아웃
import javafx.application.Application;
import javafx.collections.ObservableList;
import javafx.geometry.Insets;
import javafx.scene.Scene;
import javafx.scene.control.Button;
import javafx.scene.control.TextField;
import javafx.scene.layout.HBox;
import javafx.stage.Stage;

public class AppMain extends Application {

    @Override
    public void start(Stage primaryStage) throws Exception {
        HBox hbox = new HBox();
        hbox.setPadding(new Insets(10));
        hbox.setSpacing(10);

        TextField textField = new TextField();
        textField.setPrefWidth(200);

        Button button = new Button();
        button.setText("확인");

        ObservableList list = hbox.getChildren();
        list.add(textField);
        list.add(button);

        Scene scene = new Scene(hbox);

        primaryStage.setTitle("AppMain");
        primaryStage.setScene(scene);
        primaryStage.show();
    }

    public static void main(String[] args) {
        launch(args);
    }
}
FXML 레이아웃
- FXML 파일 (root.fxml)
<?xml version="1.0" encoding="UTF-8"?>

<?import javafx.scene.layout.HBox?>
<?import javafx.geometry.Insets?>
<?import javafx.scene.control.*?>

<HBox xmlns:fx="http://javafx.com/fxml">
    <padding>
        <Insets top="10" right="10" bottom="10" left="10"/>
    </padding>
    <spacing>10</spacing>

    <children>
        <TextField>
            <prefWidth>200</prefWidth>
        </TextField>

        <Button>
            <text>확인</text>
        </Button>
    </children>
</HBox>
- AppMain 클래스
import javafx.application.Application;
import javafx.fxml.FXMLLoader;
import javafx.scene.Parent;
import javafx.scene.Scene;
import javafx.stage.Stage;

public class AppMain extends Application {

    @Override
    public void start(Stage primaryStage) throws Exception {
        Parent root = FXMLLoader.load(getClass().getResource("root.fxml")); // ← FXML 로드
        Scene scene = new Scene(root);

        primaryStage.setTitle("AppMain");
        primaryStage.setScene(scene);
        primaryStage.show();
    }

    public static void main(String[] args) {
        launch(args);
    }
}
레이아웃(layout) 여백: 패딩(padding)과 마진(margin)
- Margin, Padding 설정 방법
// top, right, bottom, left를 모두 동일한 값으로 설정할 때
// Insets(double topRightBottomLeft)
new Insets(50);

// top, right, bottom, left를 다를 값으로 설정할 때
// Insets(double top, double right, double bottom, double left)
new Insets(10, 20, 30, 40);
- 패딩과 마진 적용 예
import javafx.application.Application;
import javafx.geometry.Insets;
import javafx.scene.Scene;
import javafx.scene.control.Button;
import javafx.scene.layout.HBox;
import javafx.stage.Stage;

public class AppMain extends Application {

    @Override
    public void start(Stage primaryStage) throws Exception {
        // 패딩 설정
        HBox hbox = new HBox();
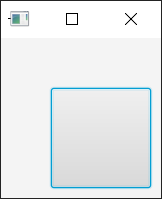
        hbox.setPadding(new Insets(50, 10, 10, 50));
        Button button = new Button();
        button.setPrefSize(100, 100);

        // 마진 설정
        // HBox hbox = new HBox();
        // Button button = new Button();
        // button.setPrefSize(100, 100);
        // HBox.setMargin(button, new Insets(10, 10, 50, 50));

        hbox.getChildren().add(button);

        Scene scene = new Scene(hbox);

        primaryStage.setTitle("AppMain");
        primaryStage.setScene(scene);
        primaryStage.show();
    }

    public static void main(String[] args) {
        launch(args);
    }
}
FXML 작성 규칙
| 프로그램적 레이아웃 자바 코드 | FXML 레이아웃 태그 |
|---|---|
| HBox hbox = new HBox(); hbox.setPadding(new Inset(10, 10, 10, 10)); hbox.setSpacing(10); |
<HBox xmlns:fx="http://javafx.com/fxml"> <padding> <Insets top="10" right="10" bottom="10" left="10"/> </padding> </HBox> |
| TextField textField = new TextField(); textField.setPrefWidth(200); |
<TextField> <prefWidth>200</prefWidth> </TextField> |
| Button button = new Button(); button.setText("확인"); |
<Button> <text>확인</text> </Button> |
| ObsetvableList list = hbox.getChildren(); list.add(textField); list.add(button); |
<children> <TextField> <prefWidth>200</prefWidth> </TextField> <Button> <text>확인</text> </Button> </children> |
패키지(package) 선언
| 자바 코드 | FXML 태그 |
|---|---|
| import javafx.scene.layout.HBox; | <?import javafx.scene.layout.HBox?> |
| import javafx.scene.control.*; | <?import javafx.scene.control.*?> |
- <?import?>가 들어가는 위치는 <?xml ...>와 루트 컨테이너 태그 사이이다.
<?xml version="1.0" encoding="UTF-8"?>

<?import javafx.scene.layout.HBox?>
<?import javafx.scene.control.*?>

<루트 컨테이너 xmlns:fx="http://javafx.com/fxml">
...
</루트 컨테이너>
- import를 제대로 하지 않으면 not a valid type 메시지와 함께 javafx.fxml.LoadException 발생
태그(tag) 선언
- 시작 태그와 끝 태그가 매칭되어야 한다.
| 자바 코드 | FXML |
|---|---|
| Button button = new Button(); button.setText("확인"); |
<Button> <text>확인</text> </Button> |
속성(attribute) 선언
- 속성은 "나 '로 감싸야 한다.
<태그이름 속성명="값" 속성명='값'> ... </태그이름>
- 속성명은 Setter 메소드 명이 옴
- 모든 Setter가 사용될 수 있는 것은 아님. 기본 타입(boolean, byte, short, char, int, long, float, double)의 값을 세팅하거나, String을 세팅하는 Setter만 올 수 있음
- 예
| 자바 코드 | FXML (Setter 태그) | FXML (Setter 속성) |
|---|---|---|
| Button button = new Button(); button.setText("확인"); |
<Button> <text>확인</text> </Button> |
<Button text="확인"/> |
객체 선언
클래스 속성
- 생성자에 매개 변수가 있고, 매개 변수에 @NamedArg(javafx.beans.NamedArg) 어노테이션이 적용되어 있으면 속성명이나 자식 태그로 작성할 수 있음
| <클래스 매개변수="값"> |
<클래스> <매개변수>값</매개변수> </클래스> |
- 예
- HBox를 패딩할 때 setPadding(Insets value) 메소드를 사용하는데
- Insets는 기본 생성자가 없고,
- Insets(double topRightBottomLeft) 또는 Insets(double top, double right, double bottom, double left)만 있음
- 이 경우 아래와 같이 선언 가능함
| 프로그램적 레이아웃 자바 코드 | FXML 레이아웃 태그 |
|---|---|
| HBox hbox = new HBox(); hbox.setPadding(new Inset(10, 10, 10, 10)); hbox.setSpacing(10); |
<HBox> <padding> <Insets top="10" right="10" bottom="10" left="10"/> </padding> </HBox> |
클래스 fx:value
- 클래스가 valueOf(String) 메소드를 제공하는 경우
<클래스 fx:value="값" />
| 기본 코드 | FXML |
|---|---|
| String.valueOf("Hello, World!"); Integer.valueOf("1"); Double.valueOf("1.0"); Boolean.valueOf("false"); |
<String fx:value="Hello, World!"/> <Integer fx:value="1"/> <Double fx:value="1.0"/> <Boolean fx:value="false"/> |
클래스 fx:constant
- 클래스에 정의된 상수값을 얻고 싶을 경우
<클래스 fx:constant="상수" />
| 기본 코드 | FXML |
|---|---|
| Button button = new Button(); button.setMaxWidth( Double.MAX_VALUE ); |
<Button> <maxWidth> <Double fx:constant="MAX_VALUE"/> </maxWidth> <Button> |
클래스 fx:factory
- 어떤 클래스는 new 연산자로 객체를 생성할 수 없고,
- 정적 메소드(이를 factory 메소드라 부른다)로 객체를 얻어야 하는 경우가 있음
<클래스 fx:factory="정적메소드" />
- 예:
ObservableList의 구현 객체는javafx.collections.FXCollections의 정적 메소드인observableArrayList(E... items)메소드로 얻을 수 있다.
| 기본 코드 | FXML |
|---|---|
| ComboBox combo = new ComboBox(); combo.setItems(FXCollections.observableArrayList("공개", "비공개")); |
<ComboBox> <Items> <FXCollections fx:factory="observableArrayList"> <String fx:value="공개"/> <String fx:value="비공개"/> </FXCollections> </items> </ComboBox> |
FXML 로딩과 Scene 생성
- FXML 파일을 작성한 후 이를 이용하여 객체를 만들어야 한다. 이를 FXML loading이라고 한다.
- javafx.fxml.FXMLLoader를 이용
- 두 개의 load() 메소드 : 정적 메소드, 인스턴스 메소드
Parent root = FXMLLoader.load(getClass().getResource("xxx.fxml"));
- getClass() - 현재 클래스 리턴
- getResource() - 클래스가 위치하는 곳에서 상대 경로로 리소스의 URL을 리턴
- load() - FXML 파일을 로딩
FXMLLoader loader = new FXMLLoader(getClass().getResource("xxx.fxml"));
Parent root = (Parent)loader.load();
- load() - Parent 타입을 리턴함. 이것은 FXML 파일에서의 루트 태그로 선언된 컨테이너임
- 만을 루트 태그가 <HBox> 라면 다음과 같이 작성해도 됨
HBox hbox = (HBox) FXMLLoader.load(getClass().getResource("xxx.fxml"));
- 예제 코드
import javafx.application.Application;
import javafx.fxml.FXMLLoader;
import javafx.scene.Parent;
import javafx.scene.Scene;
import javafx.stage.Stage;

public class AppMain extends Application {

    @Override
    public void start(Stage primaryStage) throws Exception {
        Parent root = FXMLLoader.load(getClass().getResource("root.fxml"));
        Scene scene = new Scene(root);

        primaryStage.setTitle("AppMain");
        primaryStage.setScene(scene);
        primaryStage.show();
    }

    public static void main(String[] args) {
        launch(args);
    }
}
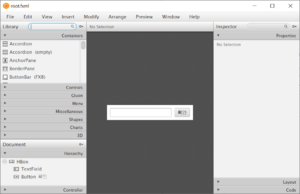
JavaFX Scene Builder
- Scene Builder 다운로드 - https://gluonhq.com/products/scene-builder/
- SceneBuilder extension for Visual Studio Code
- vscode에서 Ctrl-Shift-P를 눌러 "Configure Scene Builder path"를 실행한다.
- 경로를 다음과 같이 지정한다 : C:\Users\profs\AppData\Local\SceneBuilder 폴더의 SceneBuilder.exe 지정
- vscode에서 Ctrl-Shift-P를 눌러 "Configure Scene Builder path"를 실행한다.
- Scene Builder 띄우는 방법
- fxml 파일을 선택한다.
- vscode에서 Ctrl-Shift-P를 누른다.
JavaFX 컨테이너
| 컨테이너 | 설명 |
|---|---|
| AnchorPane | 컨트롤을 좌표로 배치하는 레이아웃 |
| BorderPane | 위, 아래, 오른쪽, 왼쪽, 중앙에 컨트롤을 배치하는 레이아웃 |
| FlowPane | 행으로 배치하되 공간이 부족하면 새로운 행에 배치하는 레이아웃 |
| GridPane | 그리드로 배치하되 셀의 크기가 고정적이지 않은 레이아웃 |
| StackPane | 컨트롤을 겹쳐서 배치하는 레이아웃 |
| TilePane | 그리드로 배치하되 고정된 셀의 크기를 갖는 레이아웃 |
| HBox | 수평으로 배치하는 레이아웃 |
| VBox | 수직으로 배치하는 레이아웃 |
AnchorPane 컨테이너
- AnchorPane에서 사용할 수 있는 주요 설정
| 태그 및 속성 | 설명 | 적용 |
|---|---|---|
| PrefWidth | 폭을 설정 | AnchorPane |
| PrefHeight | 높이를 설정 | AnchorPane |
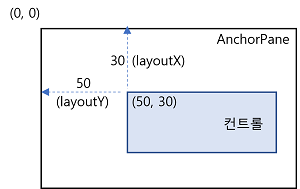
| layoutX | 컨트롤의 X 좌표 | 컨트롤 |
| layoutY | 컨트롤의 Y 좌표 | 컨트롤 |
| <children> | 컨트롤을 포함 | AnchorPane |
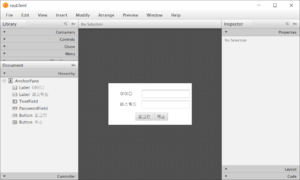
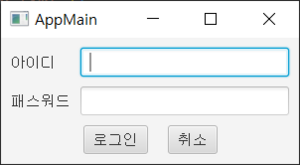
<?xml version="1.0" encoding="UTF-8"?>

<?import javafx.scene.control.Button?>
<?import javafx.scene.control.Label?>
<?import javafx.scene.control.PasswordField?>
<?import javafx.scene.control.TextField?>
<?import javafx.scene.layout.AnchorPane?>


<AnchorPane xmlns:fx="http://javafx.com/fxml" prefHeight="150.0" prefWidth="300.0">
   <children>
      <Label layoutX="42.0" layoutY="28.0" text="아이디" />
      <Label layoutX="42.0" layoutY="66.0" text="패스워드" />
      <TextField layoutX="120.0" layoutY="24.0" />
      <PasswordField layoutX="120.0" layoutY="62.0" />
      <Button layoutX="97.0" layoutY="106.0" text="로그인" />
      <Button layoutX="164.0" layoutY="106.0" text="취소" />
   </children>
</AnchorPane>
HBox와 VBox 컨테이너
| 태그 및 속성 | 설명 | 적용 |
|---|---|---|
| prefWidth | 폭을 설정 | HBox, VBox |
| prefHeight | 높이를 설정 | HBox, VBox |
| alignment | 컨트롤의 정렬을 설정 | HBox, VBox |
| spacing | 컨트롤의 간격을 설정 | HBox, VBox |
| fillWidth | 컨트롤의 폭 확장 여부 설정 | VBox |
| fillHeight | 컨트롤의 높이 확장 여부 설정 | HBox |
| <children> | 컨트롤을 포함 | HBox, VBox |
| <HBox.hgrow> <Priority fx:constant="ALWAYS"/> </HBox.hgrow> |
HBox의 남은 폭을 채움 | 컨트롤 |
| <VBox.vgrow> <Priority fx:constant="ALWAYS"/> </VBox.vgrow> |
VBox의 남을 높이를 채움 | 컨트롤 |
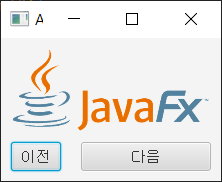
- root2.fxml
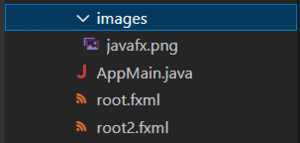
- 이 패키지의 하위 폴더로
images를 만들고 여기에 javafx.png 파일을 복사해 넣어둔다.
- 이 패키지의 하위 폴더로
<?xml version="1.0" encoding="UTF-8"?>

<?import java.lang.Double?>
<?import javafx.geometry.Insets?>
<?import javafx.scene.control.Button?>
<?import javafx.scene.image.ImageView?>
<?import javafx.scene.image.Image?>
<?import javafx.scene.layout.HBox?>
<?import javafx.scene.layout.VBox?>
<?import javafx.scene.layout.Priority?>


<VBox xmlns:fx="http://javafx.com/fxml">
   <padding>
      <Insets bottom="10.0" left="10.0" right="10.0" top="10.0" />
   </padding>

   <children>
      <ImageView fitWidth="200.0" preserveRatio="true"> <!-- 그림의 비율에 맞게 높이를 설정 -->
        <image>
          <Image url="@images/javafx.png" /> <!-- 현재 경로 기준으로 상대경로로 파일 지정 -->
        </image>
      </ImageView>
      <HBox alignment="CENTER" spacing="20.0">
         <children>
            <Button text="이전" />
            <Button text="다음">
              <HBox.hgrow><Priority fx:constant="ALWAYS"/></HBox.hgrow> <!-- 오른쪽 남은 공간을 버튼이 모두 채우도록 설정 -->
              <maxWidth><Double fx:constant="MAX_VALUE"/></maxWidth> <!-- 버튼의 폭을 자동으로 확장하기 위해 설정-->
            </Button>
         </children>
         <VBox.margin>
           <Insets top="10.0" />
         </VBox.margin>
      </HBox>
   </children>
</VBox>
- 예제
import javafx.application.Application;
import javafx.fxml.FXMLLoader;
import javafx.scene.Parent;
import javafx.scene.Scene;
import javafx.stage.Stage;

public class AppMain extends Application {

    @Override
    public void start(Stage primaryStage) throws Exception {
        Parent root = FXMLLoader.load(getClass().getResource("root2.fxml"));
        Scene scene = new Scene(root);

        primaryStage.setTitle("AppMain");
        primaryStage.setScene(scene);
        primaryStage.show();
    }

    public static void main(String[] args) {
        launch(args);
    }
}
BorderPane 컨테이너
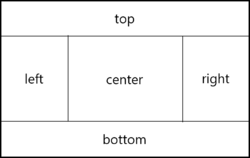
- top, bottom, left, right, center 셀에 컨트롤을 배치하는 컨테이너
- 다른 컨테이너를 배치할 수도 있음
- 각 셀에는 하나의 컨트롤 또는 컨테이너만 배치할 수 있음
| 태그 및 속성 | 설명 | 적용 |
|---|---|---|
| prefWidth | 폭을 설정 | BorderPane |
| prefHeight | 높이를 설정 | BorderPane |
| <top> | top에 배치될 컨트롤을 포함 | BorderPane |
| <bottom> | bottom에 배치될 컨트롤을 포함 | BorderPane |
| <right> | right에 배치될 컨트롤을 포함 | BorderPane |
| <left> | left에 배치될 컨트롤을 포함 | BorderPane |
| <center> | center에 배치될 컨트롤을 포함 | BorderPane |
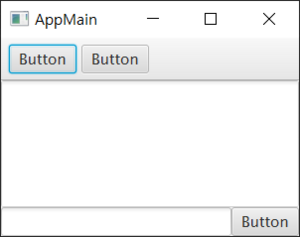
<?xml version="1.0" encoding="UTF-8"?>

<?import javafx.scene.control.Button?>
<?import javafx.scene.control.ToolBar?>
<?import javafx.scene.control.TextArea?>
<?import javafx.scene.control.TextField?>
<?import javafx.scene.layout.BorderPane?>


<BorderPane prefHeight="200.0" prefWidth="300.0" xmlns:fx="http://javafx.com/fxml">
   <top>
      <ToolBar prefHeight="40.0" prefWidth="200.0" BorderPane.alignment="CENTER">
        <items>
          <Button text="Button" />
          <Button text="Button" />
        </items>
      </ToolBar>
   </top>
   <center>
      <TextArea /> <!-- left와 right까지 확장-->
   </center>
   <bottom>
      <BorderPane>
         <center>
           <TextField /> <!-- top, bottom, left까지 확장-->
         </center>
         <right>
            <Button text="Button" />
         </right>
      </BorderPane>
   </bottom>
</BorderPane>
FlowPane 컨테이너
| 태그 및 속성 | 설명 | 적용 |
|---|---|---|
| prefWidth | 폭을 설정 | FlowPane |
| prefHeight | 높이를 설정 | FlowPane |
| hgap | 컨트롤의 수평 간격을 설정 | FlowPane |
| vgap | 컨트롤의 수직 간격을 설정 | FlowPane |
| <children> | 컨트롤을 포함 | FlowPane |
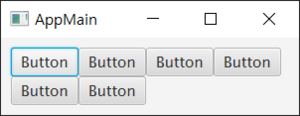
<?xml version="1.0" encoding="UTF-8"?>

<?import javafx.scene.control.Button?>
<?import javafx.geometry.Insets?>
<?import javafx.scene.layout.FlowPane?>


<FlowPane prefHeight="70.0" prefWidth="300.0" xmlns:fx="http://javafx.com/fxml">
   <padding>
      <Insets bottom="10.0" left="10.0" right="10.0" top="10.0" />
   </padding>

   <children>
      <Button text="Button" />
      <Button text="Button" />
      <Button text="Button" />
      <Button text="Button" />
      <Button text="Button" />
      <Button text="Button" />
   </children>
</FlowPane>
TilePane 컨테이너
- 그리드로 컨트롤을 배치하되 고정된 셀(타일) 크기를 갖는 컨테이너
- 오른쪽에 배치할 공간이 부족하면 새로운 행에 컨트롤을 배치함
| 태그 및 속성 | 설명 | 적용 |
|---|---|---|
| prefWidth | 폭을 설정 | TilePane |
| prefHeight | 높이를 설정 | TilePane |
| prefTileWidth | 타일의 폭을 설정 | TilePane |
| prefTileHeight | 타일의 높이를 설정 | TilePane |
| <children> | 컨트롤을 포함 | TilePane |
<?xml version="1.0" encoding="UTF-8"?>

<?import javafx.scene.image.ImageView?>
<?import javafx.scene.layout.TilePane?>


<TilePane xmlns:fx="http://javafx.com/fxml" prefHeight="100.0" prefWidth="100.0">
   <children>
      <ImageView>
        <image><Image url="@images/fruit1.jpg" /></image>
      </ImageView>
      <ImageView>
        <image><Image url="@images/fruit2.jpg" /></image>
      </ImageView>
      <ImageView>
        <image><Image url="@images/fruit3.jpg" /></image>
      </ImageView>
      <ImageView>
        <image><Image url="@images/fruit4.jpg" /></image>
      </ImageView>
      <ImageView>
        <image><Image url="@images/fruit5.jpg" /></image>
      </ImageView>
   </children>
</TilePane>
GridPane 컨테이너
| 태그 및 속성 | 설명 | 적용 |
|---|---|---|
| prefWidth | 폭을 설정 | GridPane |
| prefHeight | 놎이를 설정 | GridPane |
| hgap | 수평 컨트롤 간격을 설정 | GridPane |
| vgap | 수직 컨트롤 간격을 설정 | GridPane |
| <children> | 컨트롤을 포함 | GridPane |
| GridPane.rowIndex | 컨트롤이 위치하는 행 인덱스를 설정 | 컨트롤 |
| GridPane.columnIndex | 컨트롤이 위치하는 컬럼 인덱스를 설정 | 컨트롤 |
| GridPane.rowSpan | 행 병합 수를 설정 | 컨트롤 |
| GridPane.columnSpan | 컬럼 병합 수를 설정 | 컨트롤 |
| GridPane.hgrow | 수평 빈 공간을 채우기로 설정 | 컨트롤 |
| GridPane.vgrow | 수직 빈 공간을 채우기로 설정 | 컨트롤 |
| GridPane.halignment | 컨트롤의 수평 정렬을 설정 | 컨트롤 |
| GridPane.valignment | 컨트롤의 수직 정렬을 설정 | 컨트롤 |
<?xml version="1.0" encoding="UTF-8"?>

<?import javafx.geometry.Insets?>
<?import javafx.scene.control.Button?>
<?import javafx.scene.control.Label?>
<?import javafx.scene.control.TextField?>
<?import javafx.scene.layout.ColumnConstraints?>
<?import javafx.scene.layout.GridPane?>
<?import javafx.scene.layout.HBox?>
<?import javafx.scene.layout.RowConstraints?>

<GridPane xmlns:fx="http://javafx.com/fxml" prefWidth="300.0" hgap="10.0" vgap="10.0">
   <padding>
      <Insets topRightBottomLeft="10.0" />
   </padding>

   <children>
      <Label text="아이디" GridPane.rowIndex="0" GridPane.columnIndex="0" />
      <TextField GridPane.rowIndex="0" GridPane.columnIndex="1"
                 GridPane.hgrow="ALWAYS" /> <!-- 오른쪽 빈공간까지 확장 -->

      <Label text="패스워드" GridPane.rowIndex="1" GridPane.columnIndex="0" />
      <TextField GridPane.columnIndex="1" GridPane.rowIndex="1"
                 GridPane.hgrow="ALWAYS" /> <!-- 오른쪽 빈공간까지 확장 -->
      <HBox GridPane.rowIndex="2" GridPane.columnIndex="0"
                 GridPane.columnSpan="2" GridPane.hgrow="ALWAYS"
                 alignment="CENTER" spacing="20.0" >  <!-- 컬럼 2개 병합 -->
         <children>
            <Button text="로그인" />
            <Button text="취소" />
         </children>
      </HBox>
   </children>
</GridPane>
StackPane 컨테이너
- 컨트롤을 겹쳐 배치하는 컨테이너
- 카드 레이아웃(Card Layout)이라고도 함
- 만약 위에 있는 컨트롤이 투명하다면 밑에 있는 컨트롤이 겹쳐 보임
<?xml version="1.0" encoding="UTF-8"?>

<?import javafx.scene.image.ImageView?>
<?import javafx.scene.image.Image?>
<?import javafx.scene.layout.StackPane?>


<StackPane  xmlns:fx="http://javafx.com/fxml" prefHeight="300.0" prefWidth="500.0">
   <children>
      <ImageView fitHeight="300.0" fitWidth="500.0">
         <image>
            <Image url="@images/snow.jpg" />
         </image>
      </ImageView>
      <ImageView preserveRatio="true">
         <image>
            <Image url="@images/duke.jpg" />
         </image>
      </ImageView>
   </children>
</StackPane>
JavaFX 이벤트 처리
이벤트 핸들러(EventHandler)
- JavaFX는 이벤트 발생 콘트롤과 이벤트 핸들러(EventHandler)를 분리하는 위임형(Delegation[1]) 방식을 사용함
- 이를 위해 먼저 컨트롤에 EventHandler를 등록해야 함 (setOnXXX() 메소드. 예: setOnAction())
| 컨트롤(control) | 사건 | 이벤트(event) 발생 | 이벤트 처리 담당 객체 | 이벤트 처리 메소드 실행 | 이벤트 처리 효과 |
|---|---|---|---|---|---|
| Button | 버튼을 누름 | ActionEvent | EventHandler | public void handle(...) { 이벤트 처리 } |
1. 윈도우 닫기 2. 컨트롤 내용 변경 3. 다이얼로그 띄우기 |
- ↑ Design Pattern 중 Delegation Pattern
- Button 클릭 처리하는 이벤트 등록
Button button = new Button();
button.setOnAction(new EventHandler<ActionEvent>() {
    @Override
    public void handle(ActionEvent event) { ... }
}):
- TableView에서 행을 마우스로 클릭할 때 처리하는 이벤트 등록
TableView tableView = new TableView();
tableView.setOnMouseClicked(new EventHandler<MouseEvent>() {
    @Override
    public void handle(MouseEvent event) { ... }
});
- 윈도우 우측 상단(x) 버튼 클릭할 때 처리하는 이벤트 등록
stage.setOnCloseRequest(new EventHandler<WindowEvent>() {
    @Override
    public void handle(WindowEvent event) { ... }
});
- EventHandler는 하나의 메소드를 가진 함수적 인터페이스이므로 람다식을 이용하여 이벤트 등록 가능
button.setOnAction( event->{ ... } );
tableView.setOnMouseClicked( event->{ ... } );
stage.setOnCloseRequest( event->{ ... } );
import javafx.application.Application;
import javafx.event.ActionEvent;
import javafx.event.EventHandler;
import javafx.geometry.Pos;
import javafx.scene.Scene;
import javafx.scene.control.Button;
import javafx.scene.layout.HBox;
import javafx.stage.Stage;

public class AppMain extends Application {

    @Override
    public void start(Stage primaryStage) throws Exception {
        HBox root = new HBox();
        root.setPrefSize(200, 50);
        root.setAlignment(Pos.CENTER); // 수평 중앙 정렬
        root.setSpacing(20);

        Button btn1 = new Button("버튼1");
        btn1.setOnAction(new EventHandler<ActionEvent>() {
            @Override
            public void handle(ActionEvent event) {
                System.out.println("버튼1 클릭");
            }
        });

        Button btn2 = new Button("버튼2");
        btn2.setOnAction(event->System.out.println("버튼2 클릭"));

        root.getChildren().addAll(btn1, btn2); // HBox에 btn1과 btn2를 추가
        Scene scene = new Scene(root);

        primaryStage.setTitle("AppMain");
        primaryStage.setScene(scene);
        primaryStage.setOnCloseRequest(event->System.out.println("종료 클릭"));
        primaryStage.show();
    }

    public static void main(String[] args) {
        launch(args);
    }
}
FXML 컨트롤러(Controller)
fx:controller 속성과 컨트롤러 클래스
<루트컨테이너 xmlns:fx="http://javafx.com/fxml" fx:controller="packageName.ControllerName">
   ...
</루트컨트롤러>
public class ControllerName implements Initializable {
    @Override
    public void initialize(URL location, ResourceBundle resources) { ... }
}
fx:id 속성과 @FXML 컨트롤 주입
<HBox xmlns:fx="http://javafx.com/fxml"
      fx:controller="sec05.exam02_fxml_controller.RootController"
      prefHeight="50.0" prefWidth="200.0"
      alignment="CENTER" spacing="20.0">
   <children>
      <Button fx:id="btn1" text="버튼1" />
      <Button fx:id="btn2" text="버튼2" />
      <Button fx:id="btn3" text="버튼3" />
   </children>
</HBox>
public class ControllerName implements Initializable {
    @FXML private Button btn1;
    @FXML private Button btn2;
    @FXML
    private Button btn3;

    @Override
    public void initialize(URL location, ResourceBundle resources) { ... }
}
EventHandler 등록
- AppMain.java
package ch17.p889;

import javafx.application.Application;
import javafx.fxml.FXMLLoader;
import javafx.scene.Parent;
import javafx.scene.Scene;
import javafx.stage.Stage;

public class AppMain extends Application {

    @Override
    public void start(Stage primaryStage) throws Exception {
        Parent root = FXMLLoader.load(getClass().getResource("root.fxml"));
        Scene scene = new Scene(root);

        primaryStage.setTitle("AppMain");
        primaryStage.setScene(scene);
        primaryStage.show();
    }

    public static void main(String[] args) {
        launch(args);
    }
}
- RootController.java
package ch17.p889;

import java.net.URL;
import java.util.ResourceBundle;

import javafx.event.ActionEvent;
import javafx.event.EventHandler;
import javafx.fxml.FXML;
import javafx.fxml.Initializable;
import javafx.scene.control.Button;

public class RootController implements Initializable {
    @FXML private Button btn1; // import javafx.fxml.FXML 필요
    @FXML private Button btn2;
    @FXML private Button btn3;

    @Override
    public void initialize(URL location, ResourceBundle resources) {

        btn1.setOnAction(new EventHandler<ActionEvent>() { // 직접 EventHandler 생성 후 등록
            @Override
            public void handle(ActionEvent event) {
                handleBtn1Action(event);
            }
        });

        btn2.setOnAction(event->handleBtn2Action(event)); // 람다식 이용
        // btn3.setOnAction(event->handleBtn3Action(event));
    }

    public void handleBtn1Action(ActionEvent event) {
        System.out.println("버튼1 클릭");
    }

    public void handleBtn2Action(ActionEvent event) {
        System.out.println("버튼2 클릭");
    }
    public void handleBtn3Action(ActionEvent event) {
        System.out.println("버튼3 클릭");
    }

}
- root.xml
<?xml version="1.0" encoding="UTF-8"?>

<?import javafx.scene.control.Button?>
<?import javafx.scene.layout.HBox?>


<HBox xmlns:fx="http://javafx.com/fxml"
    fx:controller="ch17.p889.RootController"
    prefHeight="50.0" prefWidth="200.0"
    alignment="CENTER" spacing="20.0">
   <children>
      <Button fx:id="btn1" text="버튼1" />
      <Button fx:id="btn2" text="버튼2" />
      <Button fx:id="btn3" text="버튼3" onAction="#handleBtn3Action"/>
   </children>
</HBox>
이벤트 처리 메소드 매핑
- FXML 파일
<Button fx:id="btn" text="버튼" onAction="#handleBtnAction" />
- Controller 클래스
public void handleBtnAction(ActionEvent event) { ... }
JavaFX 속성 감시와 바인딩
속성 감시
- JavaFX 컨트롤 속성은 세 가지 메소드로 구성
- Getter
- Setter
- Property 객체를 리턴하는 메소드
private StringProperty text = new SimpleStringProperty(); // 값이 저장될 필드

// Setter
public void setText(String newValue) {
    text.set(newValue);
}

// Getter
public String getText() {
    return text.get();
}

// Property 메소드
public StringProperty textProperty() {
    return text;
}
- text 속성을 감시하는 리스너 등록
textProperty().addListener(new ChangeListener<String>() {
    @Override
    public void changed(ObservableValue<? extends String> observable, String oldValue, String newValue) {
        ...
    }
});
- Slider의 value 속성에 리스너 등록
Slider slider = new Slider();
slider.valueProperty().addListener( new ChangeListener<Number>() {
    @Override
    public void changed(ObservableValue<? extends Number> observable, Number oldValue, Number newValue) {
        ...
    }
});
- 예제
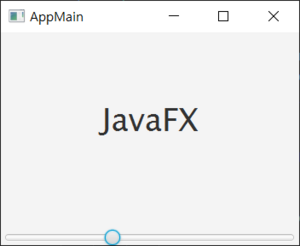
<?xml version="1.0" encoding="UTF-8"?>

<?import javafx.scene.control.Label?>
<?import javafx.scene.control.Slider?>
<?import javafx.scene.layout.BorderPane?>
<?import javafx.scene.text.Font?>

<BorderPane xmlns:fx="http://javafx.com/fxml"
      fx:controller="ch17.p891.RootController"
      prefHeight="250.0" prefWidth="350.0">
   <center>
      <Label fx:id="label" text="JavaFX">
         <font>
            <Font size="0" /> <!-- Label의 기본 폰트 크기는 0 -->
         </font>
      </Label>
   </center>
   <bottom>
      <Slider fx:id="slider" />
   </bottom>
</BorderPane>
package ch17.p891;

import java.net.URL;
import java.util.ResourceBundle;

import javafx.beans.value.ChangeListener;
import javafx.beans.value.ObservableValue;
import javafx.fxml.FXML;
import javafx.fxml.Initializable;
import javafx.scene.control.Label;
import javafx.scene.control.Slider;
import javafx.scene.text.Font;

public class RootController implements Initializable {
    @FXML private Slider slider;
    @FXML private Label label;

    @Override
    public void initialize(URL location, ResourceBundle resources) {
        slider.valueProperty().addListener(new ChangeListener<Number>() {
            @Override
            public void changed(ObservableValue<? extends Number> observable, Number oldValue, Number newValue) {
                label.setFont(new Font(newValue.doubleValue()));
            }
        });
    }

}
package ch17.p891;

import javafx.application.Application;
import javafx.fxml.FXMLLoader;
import javafx.scene.Parent;
import javafx.scene.Scene;
import javafx.stage.Stage;

public class AppMain extends Application {

    @Override
    public void start(Stage primaryStage) throws Exception {
        Parent root = FXMLLoader.load(getClass().getResource("root.fxml"));
        Scene scene = new Scene(root);

        primaryStage.setTitle("AppMain");
        primaryStage.setScene(scene);
        primaryStage.show();
    }

    public static void main(String[] args) {
        launch(args);
    }
}
속성 바인딩
- JavaFX 속성은 다른 속성과 바인딩될 수 있음
- 바인딩된 속성들은 하나가 변경되면 자동적으로 다른 하나도 변경
- 예: textArea1에서 입력된 내용이 textArea2에 자동으로 입력 (단방향)
TextArea textArea1 = new TextArea();
TextArea textArea2 = new TextArea();
textArea2.textProperty().bind(textArea1.textProperty());
- 양방향 바인딩
textArea2.textProperty().bindBidirectional(textArea1.textProperty());
Bindings.bindBidirectional(textArea1.textProperty(), textArea2.textProperty());
- Unbind
textArea2.textProperty().unbin(); // 단방향 해제
textArea2.textProperty().unbindBidirectional(textArea1.textProperty()); // 양방향 해제
Bindings.unbindBidirectional(textArea1.textProperty(), textArea2.textProperty()); // 양방향 해제
- 예제
<?xml version="1.0" encoding="UTF-8"?>

<?import javafx.geometry.Insets?>
<?import javafx.scene.control.Label?>
<?import javafx.scene.control.TextArea?>
<?import javafx.scene.layout.VBox?>


<VBox xmlns:fx="http://javafx.com/fxml" fx:controller="ch17.p893.RootController" prefHeight="200.0" prefWidth="300.0" spacing="10.0">
   <padding>
      <Insets bottom="10.0" left="10.0" right="10.0" top="10.0" />
   </padding>
   <children>
      <Label text="textArea1" />
      <TextArea fx:id="textArea1" />
      <Label text="textArea2" />
      <TextArea fx:id="textArea2" />
   </children>
</VBox>
package ch17.p893;

import java.net.URL;
import java.util.ResourceBundle;

import javafx.beans.binding.Bindings;
import javafx.fxml.FXML;
import javafx.fxml.Initializable;
import javafx.scene.control.TextArea;

public class RootController implements Initializable {
    @FXML private TextArea textArea1;
    @FXML private TextArea textArea2;

    @Override
    public void initialize(URL location, ResourceBundle resources) {
        Bindings.bindBidirectional(textArea1.textProperty(), textArea2.textProperty());
    }

}
Bindings 클래스
| 메소드 | 설명 |
|---|---|
| add, substract, multiply, divide | 속성값에 덧셈, 뺄셈, 곱셈, 나눗셈 연산을 수행하고 바인딩함 |
| max, min | 속성값과 어떤 수를 비교해서 최대, 최소값을 얻고 바인딩함 |
| greaterThan, greaterThanOrEqual | 속성값이 어떤 값보다 큰지, 같거나 큰지를 조사해서 true/false로 변환하여 바인딩함 |
| lessThan, lessThanOrEqual | 속성값이 어떤 값보다 작거나, 같거나 작은지를 조사해서 true/false로 변환하여 바인딩함 |
| equal, notEquals | 속성값이 어떤 값과 같은지, 다른지를 조사해서 true/false로 변환하여 바인딩함 |
| equalIgnoreCase, notEqualIgnoreCase | 대소문자와 상관없이 속성값이 어떤 문자열과 같은지, 다른지를 조사해서 true/false로 변환하여 바인딩함 |
| isEmpty, isNotEmpty | 속성값이 비어있는지, 아닌지를 조사해서 true/false로 변환하여 바인딩함 |
| isNull, isNotNull | 속성값이 null 또는 not null인지를 조사해서 true/false로 변환하여 바인딩함 |
| length | 속성값이 문자열일 경우 문자 수를 얻어 바인딩함 |
| size | 속성 타입이 배열, List, Map, Set일 경우 요소 수를 얻어 바인딩함 |
| and, or | 속성값이 boolean일 경우, 논리곱, 논리합을 얻어 바인딩함 |
| not | 속성값이 boolean일 경우, 반대값으로 바인딩함 |
| convert | 속성값을 문자열로 변환해서 바인딩함 |
| valueAt | 속성이 List, Map일 경우 해당 인덱스 또는 키의 값을 얻어 바인딩함 |
- 예제
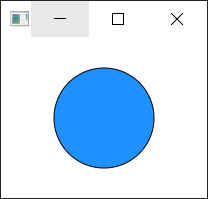
<?xml version="1.0" encoding="UTF-8"?>

<?import javafx.scene.layout.AnchorPane?>
<?import javafx.scene.shape.Circle?>


<AnchorPane xmlns:fx="http://javafx.com/fxml" fx:id="root" fx:controller="ch17.p895.RootController" prefHeight="200.0" prefWidth="300.0">
   <children>
      <Circle fx:id="circle" fill="DODGERBLUE" radius="50.0" stroke="BLACK" />
   </children>
</AnchorPane>
package ch17.p895;

import java.net.URL;
import java.util.ResourceBundle;

import javafx.beans.binding.Bindings;
import javafx.fxml.FXML;
import javafx.fxml.Initializable;
import javafx.scene.layout.AnchorPane;
import javafx.scene.shape.Circle;

public class RootController implements Initializable {
    @FXML private AnchorPane root;
    @FXML private Circle circle;

    @Override
    public void initialize(URL location, ResourceBundle resources) {
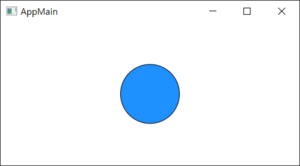
        circle.centerXProperty().bind(Bindings.divide(root.widthProperty(), 2));
        circle.centerYProperty().bind(Bindings.divide(root.heightProperty(), 2));
    }

}
